How To Make A Dining Bench With Back / Remodelaholic | Build a Custom Corner Banquette Bench - Diy, furniture, bench, tutorial, highback, tufte.
Dapatkan link
Facebook
X
Pinterest
Email
Aplikasi Lainnya
How To Make A Dining Bench With Back / Remodelaholic | Build a Custom Corner Banquette Bench - Diy, furniture, bench, tutorial, highback, tufte.. Drill pocket holes at both ends of the legs and secure them to the top support with 2 1/2″ screws. But the results are gorgeous! I mean i used to make awesome stuff all the time before i got a thickness planer, so i knew i could to it again. The height of the frame we determined from a standard chair height, which is 18 to 20 inches. This post does contain affiliate links.
Now that you have your two legs built, it's time to put the whole bench together! Cut the 2x6s to three parts at 41 inches for the top. The whole bench is 58 long. Diy wood benches with back. So i cut the 2x8x12 into two 67″ long pieces for the bench top.
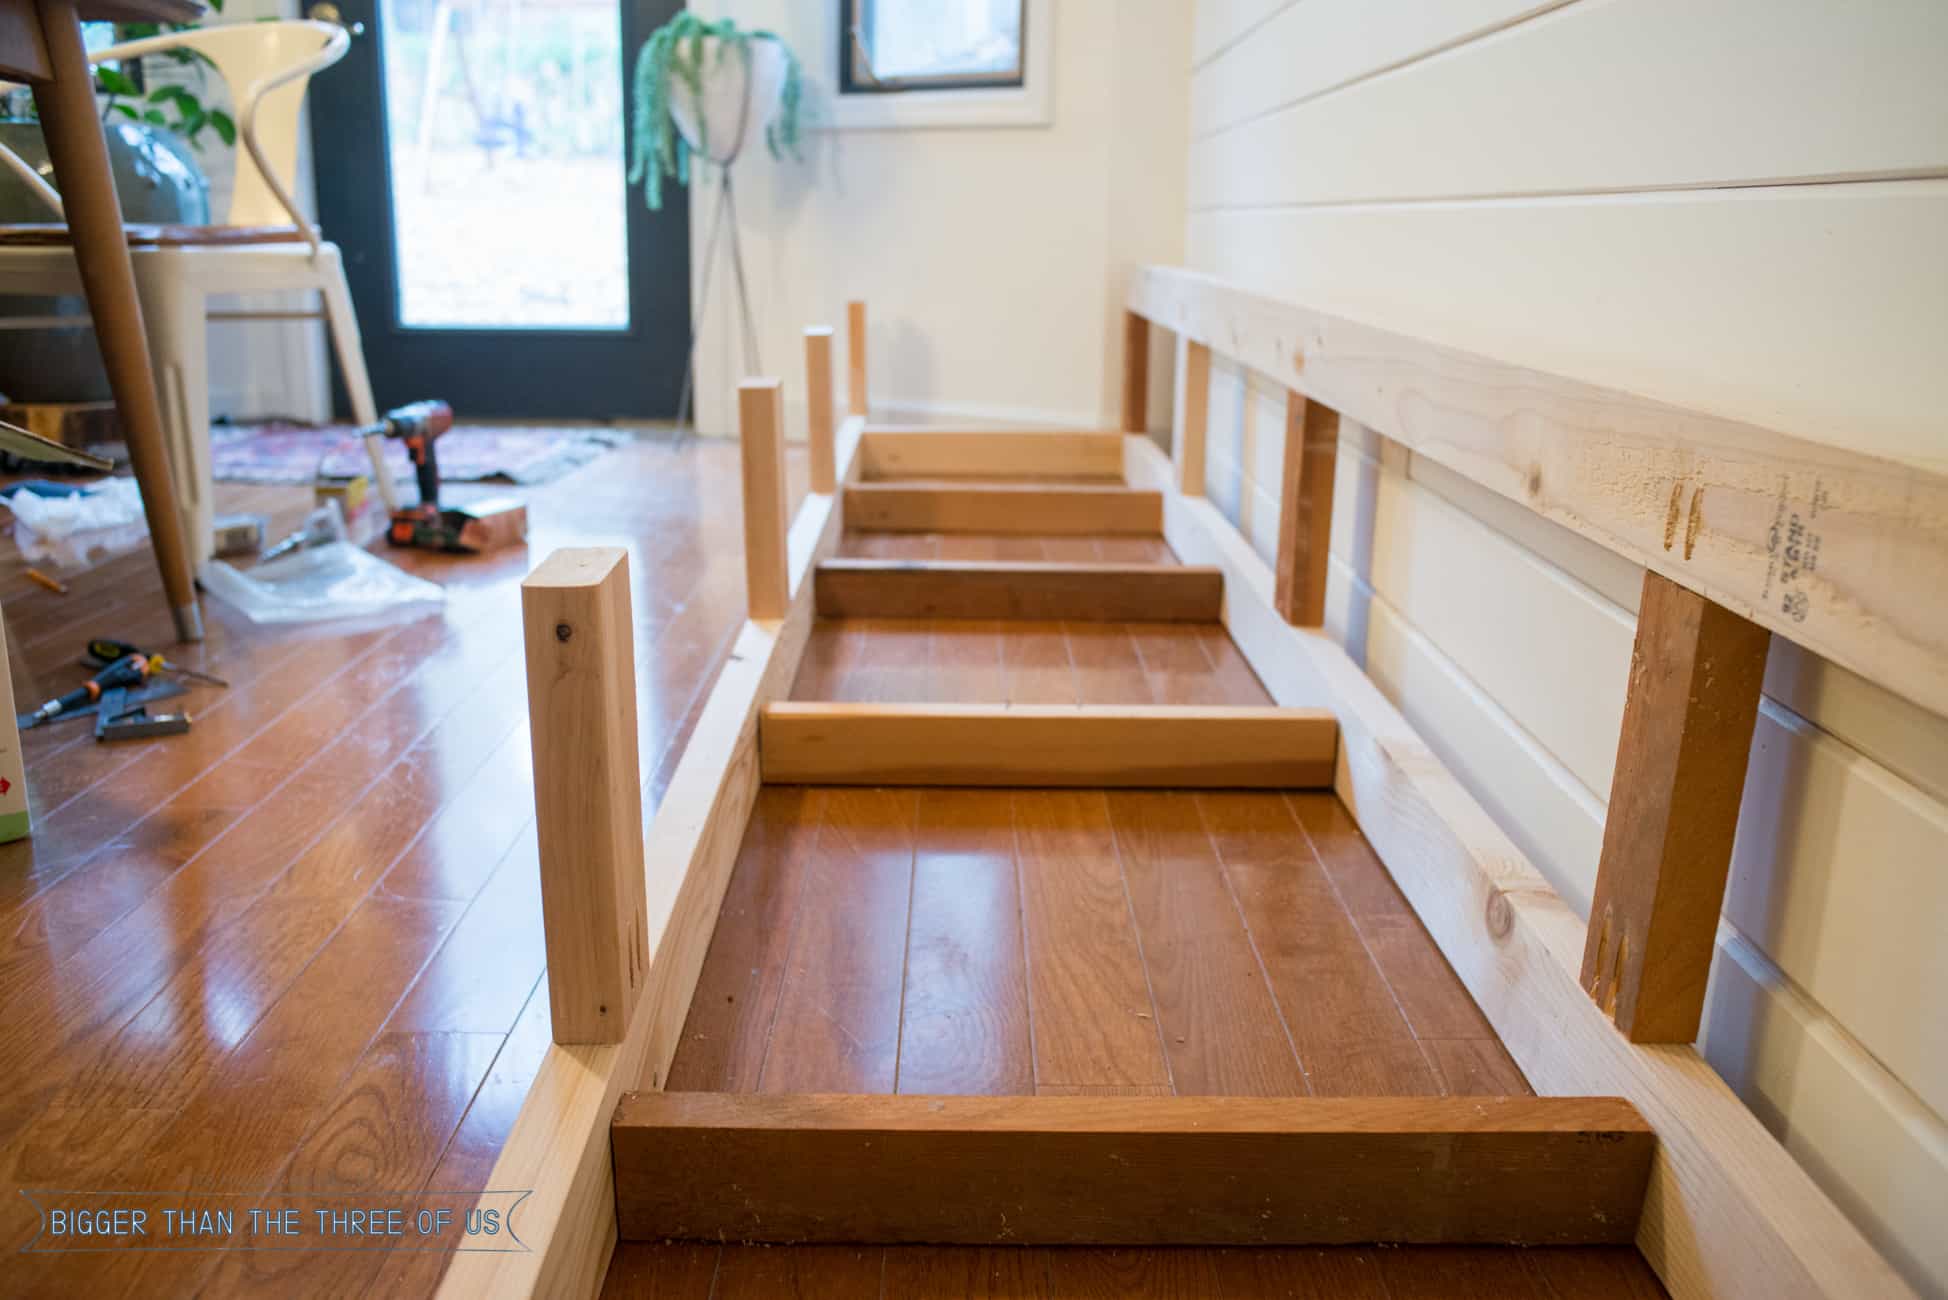
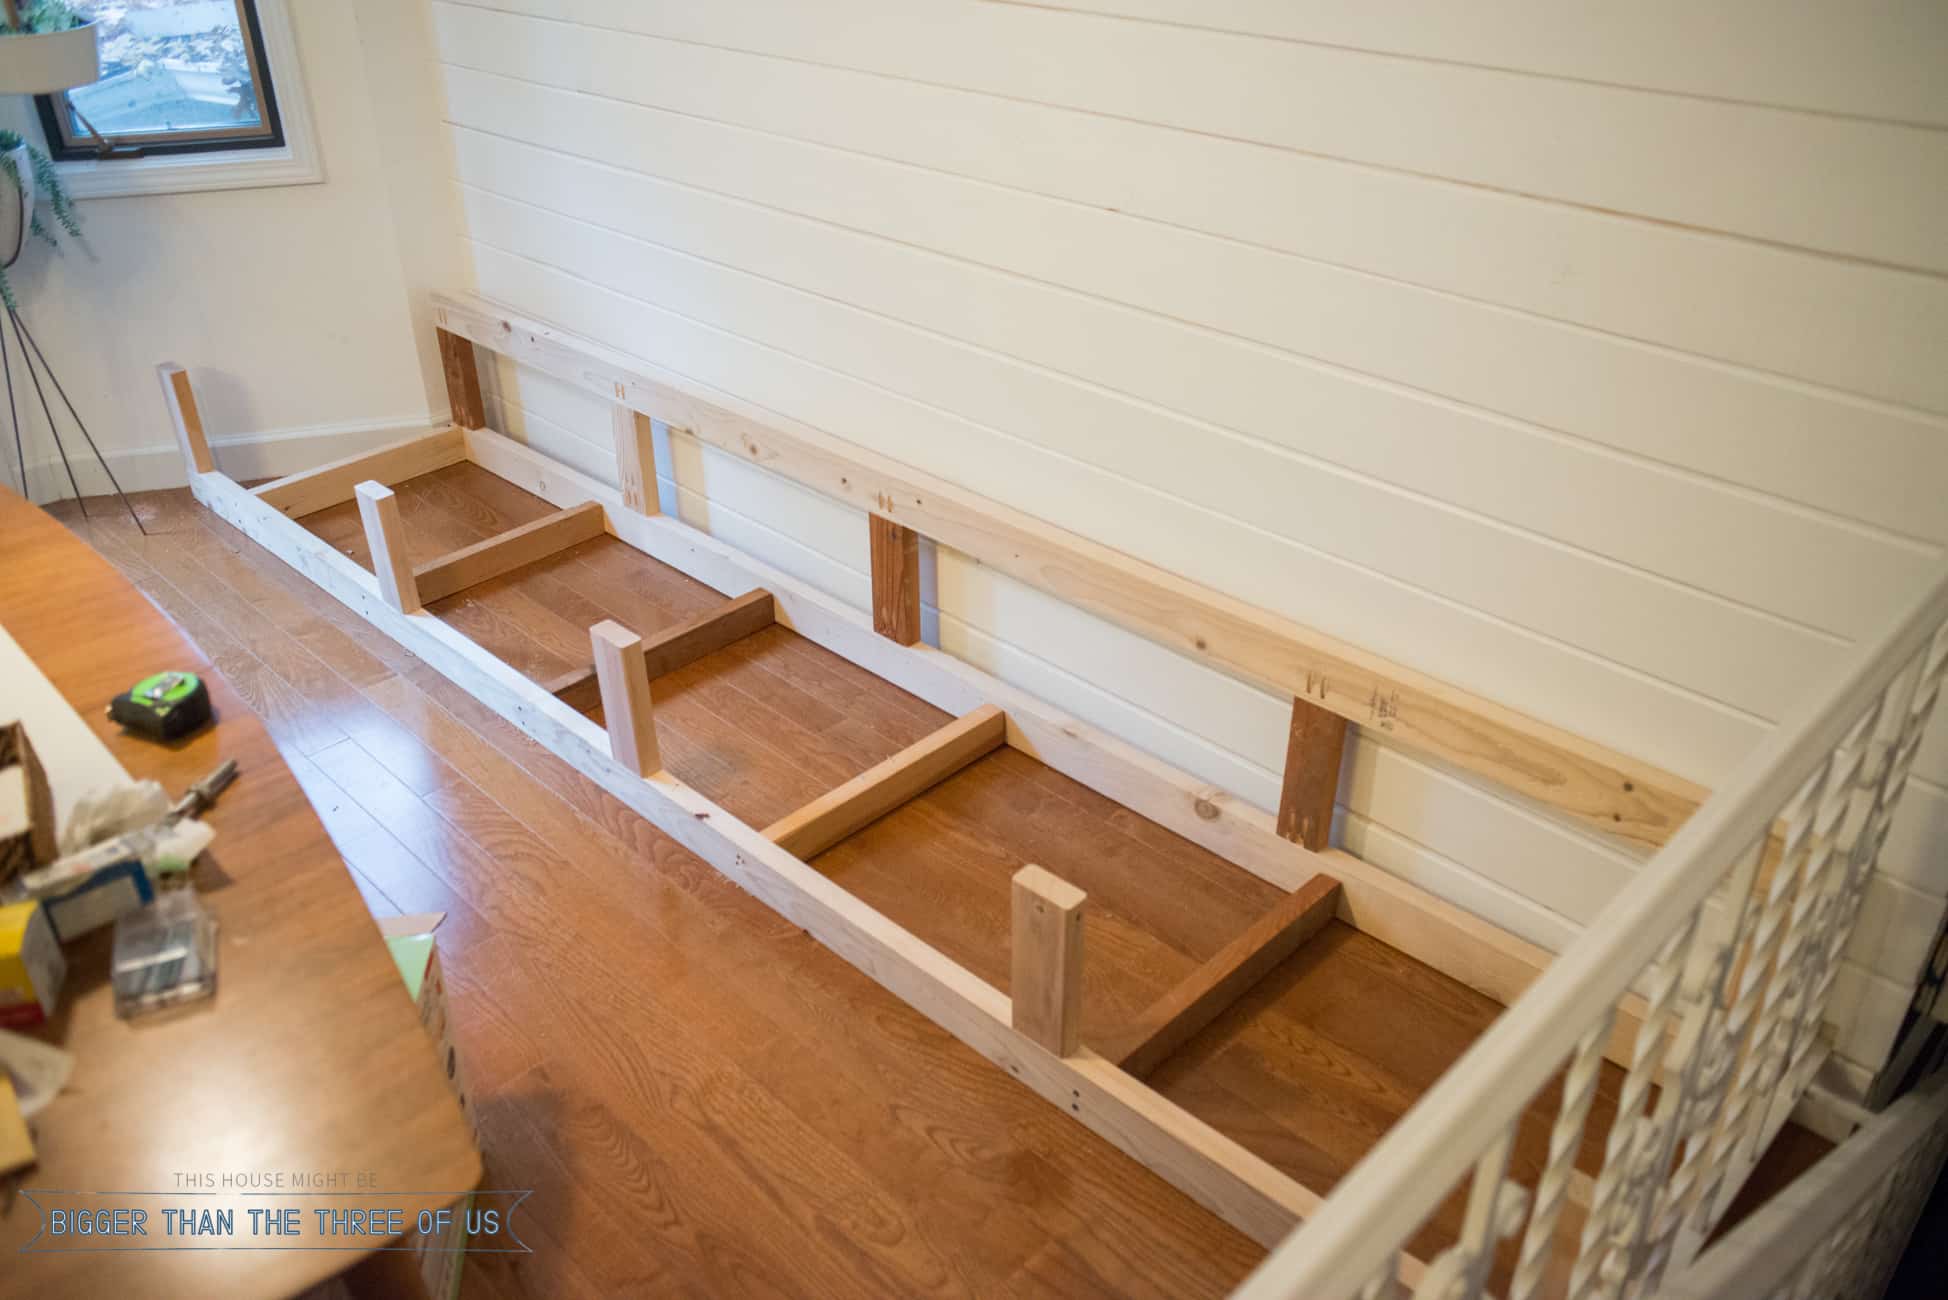
DIY Banquette Bench Seating - Bigger Than the Three of Us from biggerthanthethreeofus.com They offer a different style of seating arrangement which can make your dining experience a little cozier and is great for couples. Cut 2×4's (to desired length for bench minus 1.5 inches) and attach to wall for upper and lower frame work with proper screws to studs. The perfect size for a rustic bench with back is one that sits the number of people you will most often have in your home, and also isn't too big for the space. You can find ana's free building plans for the blue garden bench here, the swing bench here, and the wood bench with back here. Cut the legs to the desired height of the bench. Attach the backing at least 1/4″ from the back of the bench top to leave space for the 1/4″ plywood backing. This piece will be resting against a wall but if yours doesn't, reinforce. Place the two 2″ x 8″ pieces with the top down on a table or the floor.
It calls for several 2x4s of various lengths for the legs, trim, and seat.
For this, do a thorough research about upholstered dining room bench. Rock your mudroom with this stylish storage bench plan that is made of quality wood. All the details and pictures necessary to build this bench are included in the plan. It just took a little mind shift and a look back at old projects and i came up with a really cool design idea…. Diy high back dining bench. Cut 2×4's (to desired length for bench minus 1.5 inches) and attach to wall for upper and lower frame work with proper screws to studs. How to build a breakfast nook bench with storage: Not only can it be more economical (depending on how large your table is, the cost of your chairs can really add up!), but it can also make for a more versatile seating arrangement. Make sure they are good and square. 8) transform three mismatched chairs into an elegant dining room bench. These wooden storage benches with back require a bit of extra woodworking skills. Measure the area where your bench is going to be installed make sure you choose a comfortable height for your bench cut your 2×4's, and use a kreg jig to make vertical holes for your screws But the results are gorgeous!
To determine our bench frame size, we measured the entire length of the wall, the width of the wall, and the height. You can find ana's free building plans for the blue garden bench here, the swing bench here, and the wood bench with back here. Leave a 1/16 gap between the plywood pieces for the hinge. This post is not sponsored. In this video you can see how i build two benches from 2x4's only.
DIY Banquette Bench Seating - Bigger Than the Three of Us from biggerthanthethreeofus.com Set these aside for now because you won't need them again until the last step. I mean i used to make awesome stuff all the time before i got a thickness planer, so i knew i could to it again. Not only can it be more economical (depending on how large your table is, the cost of your chairs can really add up!), but it can also make for a more versatile seating arrangement. The perfect size for a rustic bench with back is one that sits the number of people you will most often have in your home, and also isn't too big for the space. These wooden storage benches with back require a bit of extra woodworking skills. For this, do a thorough research about upholstered dining room bench. This piece will be resting against a wall but if yours doesn't, reinforce. Drill pocket holes at both ends of the legs and secure them to the top support with 2 1/2″ screws.
How to build a breakfast nook bench with storage:
For the full tutorial, please visit www.fromparsimonioustoperfection.blogspot.com! Add waterproof glue to the joints, in order to enhance the rigidity of the frame. Diy high back dining bench. The seat of the bench is like a huge wooden box, the lid of which comes on a piano hinge. Here is the idea of maximizing your seating space in the outdoors by making the most out of your corner spaces on the patio or the backyard. Like the image shows, the bench seat rests on two blocks, which sets it 16 off the ground. Cut the 2x6s to three parts at 41 inches for the top. Drill pocket holes at both ends of the legs and secure them to the top support with 2 1/2″ screws. How to build a breakfast nook bench with storage: Install lag screws on each corner for added security. Set these aside for now because you won't need them again until the last step. For this, do a thorough research about upholstered dining room bench. Lay down the tongue and groove planks and fasten them to the frame with pocket holes.
Add waterproof glue to the joints, in order to enhance the rigidity of the frame. Plus, you can often tuck the bench under the table and out of the. How to build a breakfast nook bench with storage: It calls for several 2x4s of various lengths for the legs, trim, and seat. I used a thrifted headboard and french chair to complete the process.
Matching Rustic Bench with Back | Dining bench with back ... from i.pinimg.com Wood dining bench with back. We offer a tremendous collection of wood dining benches with backs that are comfortable, sturdy, and very well made from the best. For this, do a thorough research about upholstered dining room bench. For the full tutorial, please visit www.fromparsimonioustoperfection.blogspot.com! This post does contain affiliate links. I used a thrifted headboard and french chair to complete the process. Lay down the tongue and groove planks and fasten them to the frame with pocket holes. But the results are gorgeous!
Not only can it be more economical (depending on how large your table is, the cost of your chairs can really add up!), but it can also make for a more versatile seating arrangement.
Lay down the tongue and groove planks and fasten them to the frame with pocket holes. For this, do a thorough research about upholstered dining room bench. I used spax 3 ¼ construction screws. Make sure they are good and square. Mom's bench needed to be 67″ long. Make the top edges curved, using a jigsaw. Diy, furniture, bench, tutorial, highback, tufte. Use the backrest supports from 2×4 lumber. Like the image shows, the bench seat rests on two blocks, which sets it 16 off the ground. All the details and pictures necessary to build this bench are included in the plan. However, intricate details must also be checked before buying the product. They offer a different style of seating arrangement which can make your dining experience a little cozier and is great for couples. Measure the area where your bench is going to be installed make sure you choose a comfortable height for your bench cut your 2×4's, and use a kreg jig to make vertical holes for your screws
Lighting Stores In Spartanburg Sc : Outdoor Lighting Service Outdoor Illumination Llc Spartanburg Sc : Maybe you would like to learn more about one of these? . Maybe you would like to learn more about one of these? Maybe you would like to learn more about one of these? Book Hilton Garden Inn Spartanburg Sc In Spartanburg Sc Online Booking 24 7 Service Happy Holidays from q-xx.bstatic.com Maybe you would like to learn more about one of these? Maybe you would like to learn more about one of these? Maybe you would like to learn more about one of these? Maybe you would like to learn more about one of these? Home Gallery Of Lighting from galleryoflighting.com Maybe you would like to learn more about o...
Car Storage El Paso Tx - Storage Units In Sweetwater Tx And El Paso Tx Love S Storage Solutions - El paso (tx) 14751 marina ave el paso, tx 79938; . Whether you're looking for hampton bay patio furniture or cleaning supplies we've got you covered. Nov 13, 2003 · shop costco's el paso, tx location for electronics, groceries, small appliances, and more. Our junk car buyers are nearby. Number of free storage days: Day vehicle was awarded + 4 day(s) Nov 13, 2003 · shop costco's el paso, tx location for electronics, groceries, small appliances, and more. Where do i get cash for my junk car? Here at your local hardware store, we have everything you need for your diy project. Number of free storage days: 1800 cash for junk cars pays cash for junk cars, trucks, suvs, rvs or boats within 24 hrs. Cubesmart Self Storage 27 Photos Self Storage 9447 Diana Dr El Paso Tx Phone Number ...
Coffee Table Book Display Ideas : 29 Tips For A Perfect Coffee Table Styling Belivindesign / Place two other accessories on the tray. . Instead we're proposing a slightly different approach: Choose one or two books to showcase on the top of your table and stack further titles on a shelf below the table. Install a ledge wall shelf on an empty wall. It's hard to go wrong with the classics. When decorating your coffee table, remember that placement matters, too. So whether you're looking for coffee table display materials for an office, guest house, or your home, we have you covered. Since coffee table photo books are on display 24/7, it's essential that you create one that looks amazing. Sometimes if i have a rather large coffee table, i will use multiple stacks of books and put different accessories on top of each to give it a unified look. This iconic tome features a collection of photos from one of america's most influential photographers, an...


Komentar
Posting Komentar